

Well, here's how:
1. Fold fabric and make sure the selvage is lined up properly. See how the part that the fabric store cut is way off on mine? Yes. This happens. You need to line it up so that your fabric isn't all bunched or pulling to one side. It needs to be naturally flat. Which will cause your cut edge to probably be off.

2. Next, if your fabric is like mine, and you have a medium sized cutting board, like me, then you should probably just fold up your fabric again, and line up your fold with the selvage PERFECTLY. This just makes it a lot easier to cut!

3. Now you want to straighten that edge. The best way I've found to do this is to line up the top selvage part on a line, and the bottom fold on a line, and then line up your ruler with each of those lines...and cut!

4. If you don't know the exact size of your pillow, do what I did. Put your pillow on the cutting board and flatten it until the entire top or bottom seam is flat. Do the same with the sides, and you have your dimensions!

5. Next, cut the other side so that you have the right width.

6. This part I didn't document well, but you'll want to unfold your fabric and fold it the other way, so that you can cut your height of the pillow.

Now you have two sides to the pillow! Perfecta!

7. Now...I don't have very good lighting here- so click on the photo for a better closeup. I marked the fabric and measured precisely where I wanted my tucks. I did something like...5 1/2 in apart...but really- you can decide what distance apart you want because I'm sure closer or farther apart would look great! Especially for different types of projects. Just make sure that the rows next to each other should not align. As in...each tuck should fall in the middle of the above and below tucks. Make sense? Scroll down to the finished product to make sense of that. You only need to do this on ONE of the pieces of fabric. It's okay if the back of the pillow is flat and boring- cause no one's gonna see it!

8. Head on over to your sewing machine and put your settings so that your stitch length is about a 1.5 or so. This way your stitches are tiny...I didn't want my tucks to come loose!

9. This is the REALLY technical part:) Take your fingers and pinch right where your dot is. Twist the fabric, and sew back and forth (forward, and back-stitch, forward, and back-stitch) a few times about 1/4 inch from point.


10. Continue doing this on all of your dots until the back of the fabric looks like this!
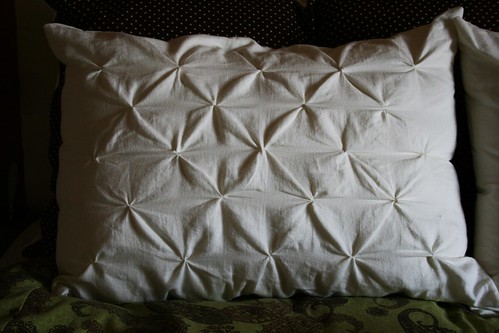
 Notice how none of them are quite the same? This is the great thing about these pillows- they don't have to be perfect! And no one really notices. As long as they are all measured to align right- it doesn't matter if one tuck is sewn vertical when one is sewn horizontal. Ya know?
 11. I used an invisible zipper for my closure which you can learn how to do on the package. It's pretty simple. After I sewed in the zipper I sewed all around the rest of the pillow and voila!
That's how ya do it! Pretty simple right? Go make some pin-tuck pillows, blankets, bags, whatever! Just a warning though- though the process is simple, it is VERY time consuming. Each step takes way longer than expected.
5 comments:
oh my gosh. I have been searching the internet for DAYS and looking at all sort of fabric stores to see if they already sold fabric pre-made like this and I have had no luck.
Your tutorial seems super easy and it is defintely something I will be trying out for myself.
Wish me luck!
Hi! Thank you for this. I made a tucked pillow using your tucking method and I'm putting a link to your instructions on my blog today.
Have a wonderful weekend!
Thank you for doing this tutorial! I am getting ready to make a baby blanket like this, but I was unsure how much extra fabric I need to add. How much did you add for your pillow? I am making a crib sized blanket. Thanks for your help!
I found this post by googling for pillows of tucked/pulled fabric. These are very close to the ones I remember, but those were made of fabric in 1" checks (like a picnic tablecloth), and I'm pretty sure they were made by hand, as a craft.
This was back in the 70s and I've been using a lot of "Old Days" posts on my blog, and thought I'd mention these. The funny thing is that they were never used on a sofa or bed, but always displayed in the back windows of CARS.
I never understood it then, and not now---just some sort of fad, I suppose, but a lot of busy fingers were sewing them back then.
I'd love to hear if you know any such pattern/technique/pillow pattern. It was a simple stitch, pulled corner to corner, I think (I'm absolutely ALL THUMBS when it comes to sewing) and resulted in a pillow with lots of little rows of points on top.
Thanks!!
rachel
Great reaad thank you
Post a Comment